Blinds offer a streamlined aesthetic for small windows that can make a big impact. They’re also easy to maintain with a variety of durable materials.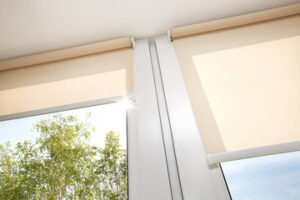
Depending on your window location, you might need functional features like privacy or light control. Luckily, many types of blinds for small windows come with customizable options.
One of the most popular window blinds for small windows, roller shades offer versatility when it comes to light control. They come in a wide range of colors and materials, making them suitable for both contemporary and traditional spaces. In addition, they can be fitted to a variety of window frames. They can also be customized with a number of options, like cordless or motorized operation.
With a clean, flat design, roller shades are the ideal complement to modern décor. They are the perfect choice for rooms that receive a lot of sun, as they provide excellent UV protection while still maintaining the view. They’re a great option for bedrooms or nurseries, too, as they can be made into room darkening shades to help promote restful sleep.
They’re also low maintenance, as dirt and grime wipe away easily from their smooth surfaces. This is particularly true if they’re made from a hardy and durable material, such as metal or faux wood. They can even be fitted with a motor to make them operate more quickly and efficiently. For high-traffic areas, such as a frequently used patio door or the window above your kitchen sink, this is an especially important feature.
Unlike other window treatments, which can have a lot of details and embellishments that can detract from their minimalist aesthetic, roller shades are completely free of frills.
One drawback of roller shades is that they can leave a slight gap on the sides of your window when they’re closed. However, this gap is minimal and can be easily corrected with trims that cover it.
With all of the available color, fabric, and opacity choices, roller shades are an ideal window treatment for nearly any room. Depending on the type of fabric and the opacity, they can be used as a light-filtering or light-diffusing window covering, or as full room darkening shades for sleep and privacy.
Mini Blinds
Choosing window blinds for small windows can be a challenge. But with the right selection, these often overlooked spaces can become a focal point that enhances a room’s design. By considering function and style, as well as budget, the right treatment will make these spaces stand out.
There are many different options available for small window treatments, from simple roller shades to slatted wood blinds. To find the best match, start by measuring the width and height of the windows and comparing them to your preferred product’s measurement chart. You’ll also want to consider any obstructions like overhangs and trim that may interfere with mounting hardware.
Mini blinds are a cost-conscious choice that come in a wide range of colors and styles. Narrower 1/2-inch slats work well for openings less than 36 inches, while wider 1-inch slats can handle window sizes up to 60 inches. Blinds can be mounted inside the window frame for a clean look, or outside for a more traditional appearance. Blinds can also be fitted with a variety of controls, from cords to wands, and can be made to fit either side of the window for convenient operation.
Another option for small windows is slatted wood blinds, which provide a classic look and are available in a variety of colors and materials to suit any décor. These window coverings can be paired with a variety of valances to create a custom look. They can also be fitted with a top slat that can block out light for privacy without blocking the view out the window.
A great choice for small window treatments in the kitchen, bathroom, or bedroom are cellular shades. These window treatments are made with a high-insulating material that helps to reduce heat transfer and energy costs. They’re available in a number of different colors and shades to complement any interior design, from light-filtering cellular shades to full blackout cellular shades that help create restful sleep.
To keep these window treatments looking their best, they should be cleaned regularly to remove dust and dirt. The best way to clean them is with a damp cloth or sponge, although you can also use a mild detergent. If your blinds have a cord, be sure to tie them up when not in use to prevent children or pets from tripping over them.
Cellular Shades
Cellular Shades, also called honeycomb shades, offer many benefits for small windows. They’re highly insulating, and the cellular structure looks very sleek and stylish. They come in a variety of colors and fabrics, including light filtering options that soften natural light to make a room feel larger. They’re available as an inside mount or outside mount option, and they can be customized for most window shapes and sizes.
Cellular shades are very easy to maintain. They can be dusted regularly with a cloth or vacuum cleaner attachment, and they can be spot cleaned as needed using mild detergents. They’re designed to withstand years of regular use, and they don’t require frequent replacement like some cheaper window treatments do.
They’re also very energy efficient. Their cellular structure traps air and reduces heat loss, which means that they keep your home warmer in the winter and cooler in the summer. They also reduce outside noise, as the insulated materials help to dampen the sound from the street or neighboring homes.
When choosing a cellular shade for your small windows, you’ll first need to determine what size cell you prefer. Single cell cellular shades have one layer of cells and are lighter and easier to operate, while double cell cellular shades offer an extra dose of insulation for your windows. You can then choose between different operating options such as cordless, top-down/bottom-up, and motorized systems. Cordless and motorized options provide added safety for children and pets, while top-down/bottom-up allows for versatile light control and privacy.
If you have multiple pane windows in your home, it’s a good idea to match the size of the shade to each window. This will ensure that the shades fit well and minimize the amount of extra light gaps that could occur between each window.
The fabric you choose will also have a major impact on both the visual and thermal performance of your cellular shades. Light Filtering fabrics gently diffuse natural light and create a soft glow within your space, while Room Darkening fabrics block out external light to ensure a dark environment when desired.
Aluminum Metal Blinds
The slatted look of aluminum blinds gives rooms a contemporary, clean feel that complements many decor styles. Our metal blinds in Austin can be made with different slat widths and colors to fit your space, and customization options like decorative tapes add an extra touch of style.
Durable and affordable, aluminum blinds stand up to everyday wear and tear. They are resistant to fading, cracking, and warping, making them the ideal choice for high-humidity areas. In addition, they are easy to clean and are a great option for high-traffic homes with kids and pets.
If child and pet safety is a concern, all our aluminum blinds are available in cordless lift systems. The SimpleLift and LiteRise systems eliminate the danger of dangling cords, and the lift system can be locked in the closed position for added safety. They are also certified “Best for Kids” and are a great choice for homes with children and pets.
Another safety feature that is unique to our aluminum blinds is the de-Light slat feature. This feature reduces light leakage, and it is an ideal option for bedrooms, movie rooms, and offices. It eliminates cord holes and blocks 50% more light from leaking into the room, which helps your family get a restful night’s sleep.
The best feature of our metal blinds is that they are available in a wide variety of color options to fit any aesthetic. Our aluminum blinds come in a selection of mattes, metallics, and pearlescent finishes, so you can find the perfect match for your home. Our modern Precious Metals aluminum blinds are available in 1/2’’, 1’’, and 2’’ slat sizes and in a variety of widths to suit your window measurements.
Customization options include the ability to choose a left or right tilt wand, a continuous headrail option that keeps large windows looking neat and tidy, and specialty shapes. You can also customize your aluminum blinds with a wide variety of accessories, including decorative tapes, tassels, and a selection of valances.