 Over time, your insulation can lose its effectiveness. This may be due to contamination, pests, or even smoke damage.
If your existing insulation needs to be removed, it is best to use a professional. There are several reasons why this is the best option. Ultimate Radiant Barrier will save you time, money, and the hassle of doing it yourself.
Insulation is an important component of your home, protecting against heat loss and providing energy efficiency. However, over time, insulation can become damaged or no longer work properly. When this happens, hiring a professional insulation removal service is best. These professionals can safely remove and replace old insulation with new, ensuring your home is protected.
You may need to hire a professional insulation removal service for many reasons. Some common reasons include:
Water Damage
Insulation can be impacted by various factors, including water. If you notice that your insulation is wet, it needs to be removed immediately to prevent mold and other damage.
Animal Infestation
Rats, raccoons, squirrels, and other animals can cause significant damage to insulation. They will chew holes through cellulose, foam, and batting, leaving behind feces and urine. This contamination can be a serious health concern and should be addressed quickly by an insulation company.
Mold Growth
Mold is a major concern for homeowners, as it can affect air quality and lead to illness and even death. It is best to hire a professional insulation removal company that can handle mold remediation, as well as insulation removal.
Asbestos Contamination
In some cases, older insulation can contain asbestos, which is a dangerous substance that can cause respiratory problems and other health issues. An experienced professional insulation contractor will be able to identify asbestos in your insulation and will know how to dispose of it correctly.
Safety Concerns
The insulation removal process can be a dangerous job, as it requires working in tight spaces with tools that are not usually owned by the average homeowner. The process also involves handling a variety of materials that can be hazardous to your health, such as rodent droppings, fungus, and mold. A professional insulation removal service will have the right tools for the job and will ensure that all materials are disposed of safely.
Hiring a professional insulation removal service can help to reduce the risk of injury and property damage while making your home more energy efficient. They can help you choose the right type of insulation, install it quickly, and make sure that all building codes are followed. They can also give you tips on how to keep your home energy-efficient after the installation is completed.
Time
The amount of time it takes to complete the insulation removal process will vary depending on several factors. These include the type of insulation being removed, and any impediments such as ductwork or home accessories. Additionally, it depends on the size of the attic and the amount of insulation being removed. Professionals can typically remove 1,000-1,300 square feet of insulation in a day. Homeowners trying to perform this task themselves should expect it to take several days.
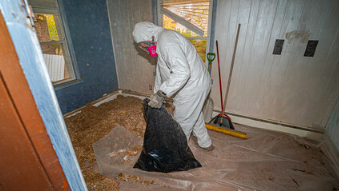
This is because insulation can be very messy and requires a lot of physical exertion to complete. The job is also challenging because it requires a certain level of skill and adherence to strict safety standards. The job also involves a significant investment in equipment and supplies, such as a commercial vacuum and large garbage bags.
Insulation can be damaged by pests, moisture, or fire, and removing it is a necessary step for preventing structural damage in the house. It can also improve energy efficiency, sanitize the area, and remove contaminants that affect indoor air quality.
Whether you need to replace old insulation because of damage or want to increase your energy efficiency, installing new insulation is an important investment that will save you money in the long run. It will reduce your utility bills and make your home more comfortable. It will also increase the resale value of your property and protect you from health problems.
The best type of insulation for a home depends on its size and purpose. Single-family homes, townhomes, and condominiums can all benefit from improved energy efficiency.
Removing old insulation will also help prevent rodent infestation and other issues. Old insulation can be contaminated with rodent urine and feces, or it may contain substances such as asbestos that can cause health problems. This is why it is important to hire a professional to perform the removal.
Once the removal process is completed, the attic can be sanitized and deodorized by spraying a deodorizing agent. Once the area is clean, the professionals will return to install the new insulation.
Safety
Insulation is an important part of home and commercial buildings, keeping them warm in winter and cool in summer. However, over time it can become worn out and less effective. This is why it’s vital to have regular inspections of your insulation and to replace it when needed. However, this process can be dangerous for homeowners and requires strict adherence to safety measures.
The first step is to make sure you have all the necessary equipment before starting your insulation removal process. This includes a dust mask or respirator, gloves, and long sleeves. This is because the fiberglass insulation material can irritate the eyes and lungs. You should also cover any openings to the room you are working in to prevent any particles from escaping into other areas of the house.
Using a professional insulation removal service can help you avoid these problems and ensure that the job is done safely and effectively. These companies can also provide a professional assessment of your property, making sure that the space is ready for new insulation. This can save you a lot of money in the long run by ensuring that your home is energy-efficient and environmentally friendly.
When choosing a contractor for your insulation removal, it’s important to choose one with experience and a track record of quality work. You should also check the company’s licensing and insurance policies to ensure that you are protected in case of an accident during the removal process. Additionally, you should ask the contractor to provide a quote before the job starts so that there are no surprises later on.
Spray foam insulation can be very dangerous to handle on your own, especially if it’s not removed properly. It can create fire hazards if you use heat sources or other tools that generate sparks, and it’s also flammable. If you don’t use proper removal techniques, it can cause a fire in your attic or wall cavities, leading to expensive damage and possible structural issues.
Old and damaged insulation can lead to poor air quality, increased energy bills, and a lower sale price if you ever plan to sell your home. By removing and replacing your old insulation, you can make your home more comfortable, save on energy bills, and increase the value of your property.
Cost
Insulation removal might not be at the top of your home improvement to-do list, but it’s a project that should not be taken lightly. It’s a messy job that involves removing old insulation and disposing of it, as well as cleaning up the mess afterward. It’s also a potentially hazardous project because of the potential health risks. Insulation can contain rodent waste, mold spores, and other contaminants that could be dangerous to your family’s health if they are inhaled.
It’s important to have your insulation removed by a professional because they have the proper safety equipment and experience needed to properly dispose of and clean up the mess. This includes wearing masks, gloves, and protective clothing to avoid breathing in any of the potentially harmful contaminants. Additionally, they will use a commercial-grade vacuum machine that will suck the insulation into waste bags and dump them into a dumpster outside. It’s a much faster process than trying to do it yourself which will quickly fill and clog.
A variety of factors will affect how much the insulation removal cost will be, including the size of your attic and the type of insulation you have in place. For example, if you have batt or rolled insulation, which needs to be bagged and removed by hand, the price will be higher than with blown-in cellulose or fiberglass insulation that can be vacuumed out using a machine.
If your existing insulation is infested with rodents, has mold or other contaminants, or has been damaged by water or other moisture, it’s best to have it professionally removed and replaced. This will improve your house’s air quality and reduce your monthly energy bills by keeping it better insulated.
Replacing your existing insulation is one of the quickest ways to improve your home’s energy efficiency and comfort. It can also help save you money on your monthly energy bills by making your home more comfortable and reducing the amount of electricity that is needed to run the appliances in your house. To get started, schedule a free quote for insulation replacement from a local contractor.
 Wiring