
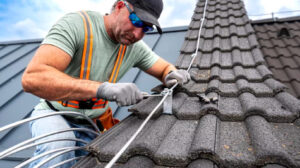
A roof system maintenance program helps prevent damage and keeps the building safe. A maintenance checklist is the best way to document and record each Alpharetta Roofing inspection. Keep the gutters clean to direct water away from the roof. Look for dirt, debris, clogs, and signs of water damage, such as mold, moss, or pooling.
Shingles
 Shingles are one of the most important parts of your roof. They protect the wood and other materials underneath from rain and sun. They also keep the heat in your house and help you save money on energy bills. And, they are beautiful and can give your house great curb appeal.
There are many different types of shingles. They can be made of asphalt, metal, clay, or wood. Asphalt shingles are the most common type. They are lightweight, affordable, and easy to install. They are available in a wide range of colors, textures and styles to match your house. These shingles are usually installed in an overlapping pattern. This helps protect the materials under them and makes them watertight.
Wood shingles are another popular type of roof covering. They are attractive and can be stained to match the color of your house. They are also fire-resistant, which is a good thing for your home. But, like all roofing material, they do need to be maintained properly. This includes regular inspections and repairs.
You should also check for rot and insect infestation. If you find any, repair them as soon as possible. Also, check for shingle damage and missing granules. Missing granules will expose the underlying asphalt to the sun’s harmful UV rays. You can tell if your shingles have lost their granules by looking for granules in the gutters and downspouts of your house.
If you notice any of these problems, call a roofing company as soon as possible. A damaged roof can leak into your home, causing damage to walls, floors, furniture and other items. This can also lead to mold and mildew, which can negatively impact your health.
In addition to shingles, you should also inspect the flashings on your roof. These are the pieces of metal or other material that seal joints and transitions on the roof, such as around chimneys and vents. You should also look for cracks and leaking areas in the flashing. If you notice any of these issues, call a roofing service for a roof inspection and repair.
Flashing
Some parts of a roof are more prone to leaks than others. These include roof valleys and any area where a structure protrudes into the roof. Flashing is a thin, impermeable material that prevents water from seeping into these areas. It is typically installed around chimneys, vents, skylights and other roof penetrations. It is also used at the edges of walls, where a gap could allow rainwater to enter. Flashing is usually metal, though some types are plastic or other modern composite materials. It is often made of copper, aluminum or galvanized steel.
There are several different kinds of flashing, each designed for a specific situation. For example, valley flashing is used to protect the areas where two downward-facing slopes of a roof meet. The flashing creates a V-shaped channel to direct rainfall. It may be hidden under shingles or left exposed. Other types of flashing include base flashing and counter flashing, which are used together to protect hard-to-waterproof features like chimneys. The base flashing piece attaches to the roof, while the counter flashing rests against the penetration and overlaps with the base flashing. This allows the flashing to expand and contract without damage, a vital factor for preventing leaks.
In addition to preventing leaks, flashing can help to prevent insects and other pests from entering a home through the roof. The flashing can be coated with insect repellent to add additional protection.
Although flashing can last a long time, it is important to check for leaks and other damage regularly. The flashing can wear down over time, and it may be subject to damage from hazards such as falling branches or foot traffic on the roof. Additionally, it can be pulled up or damaged by strong winds.
If a flashing becomes loose, it is important to contact a roofer immediately. A skilled roofer can replace it to ensure that the roof is properly waterproofed and protected from leaks. Although some flashing may be reused, it is best to have it replaced if it shows signs of wear or rust. A good roofer will use the proper flashing for a particular project, and they should be well-versed in all aspects of roofing.
Gutters
Gutters are the unsung heroes of a roof. They are responsible for ensuring that water is effectively directed away from your home, preventing a whole host of issues with your foundation, basement, and wall structures. They also help to preserve landscaping features around your home. Without gutters, rainwater would splash over the roof and wash away soil and plant life, leading to erosion, rotting fascia boards, and cracks in your walls. Gutters are a key element in preventing these problems, and it is important to have your gutters cleaned regularly.
If your gutters are clogged with leaves, twigs, and debris, they can’t do their job. In addition, water trapped in a clogged gutter will eventually back up under the eaves and overflow onto the sides of your home, causing damage to the shingles, siding, fascia, soffit, and more. Clogged gutters also increase the risk of ice damming, which can cause roof leaks and further damage to your home.
Regular gutter cleaning can prevent these problems by ensuring that water can flow freely off the roof and away from your house. They can also help to reduce the amount of dirt and dust that accumulates on your rooftop, keeping it cleaner and safer for you and your family.
Gutter systems can be made from a variety of materials, including aluminum, copper, galvanized steel, and vinyl. Each type of gutter has its own advantages and disadvantages, so it is important to consult with a professional before making a decision. A professional will be able to explain the benefits of each option and help you choose the best system for your home.
Gutters are an essential part of any roofing system, and they are often overlooked by homeowners. Proper maintenance can extend the life of your gutters and ensure that they work properly. TC Backer Construction offers a wide range of high-quality gutter solutions, including the Leafguard gutter system, which provides a clog-free guarantee and ultimate durability. Contact us today to learn more about the benefits of gutters and to schedule a free roof inspection and quote.
Soffit
The soffit is the skin that covers your eaves and helps prevent moisture buildup, mold growth and rot. It also helps keep pests out and air in. If your soffit becomes damp, moldy and overgrown with weeds it can cause problems such as sagging roof boards or leaks in the attic. If you notice any mildew on the soffit, it is easy to clean with a broom and bleach solution. If you have wood soffit, it should be painted periodically to help protect the material. It is best to consult a professional to determine the proper material for your area’s climate and weather conditions.
A soffit can be non-vented or vented to allow for adequate roof ventilation. Ventilation is critical for a healthy home because it helps reduce the temperature in the attic and lowers energy costs. In the winter, a cooler attic helps prevent snow from melting and running down to the gutters and collecting into ice dams.
Often, when homeowners have mold or mildew on the fascia, it’s because of an un-ventilated attic. Keeping the attic well ventilated can save your homeowner hundreds of dollars a year on energy bills, keep their home safe from infestation by insects and other pests and improve indoor air quality.
Fascia and soffits come in a variety of materials such as aluminum, wood or vinyl. Each type has its advantages and disadvantages. Aluminum is an excellent choice for coastal areas because it is resistant to salt water corrosion. Wood is susceptible to rotting and warping and can be expensive to maintain whereas vinyl is virtually maintenance-free.
When choosing a soffit and fascia, consult with your roofing contractor to make sure you are selecting the right product for your area’s weather conditions. Then you will be able to avoid costly damage, rotting and infestation of insects and other pests.
It’s important to have a professional inspect your roof and soffit system at least once a year to ensure that all components are functioning correctly. The inspection will also help identify any potential problems. Remember, a damp, moldy or overly hot attic can lead to serious property damage, health and safety issues and increase your energy costs.
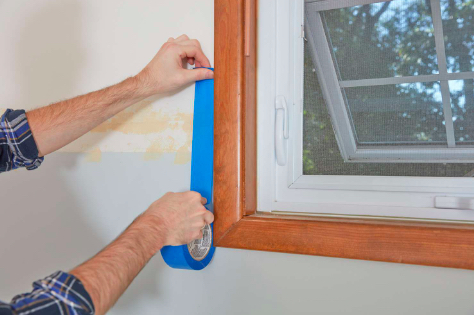
 Home interior painting can transform a space, creating the perfect backdrop for your furniture, decor and lifestyle. It’s also one of the best return-on-investment home improvement projects, boosting your property value and helping you sell your home faster.