Paint gives a fresh, colorful look to an old deck and helps protect the wood. Paint can also unify the color of a house’s exterior with the deck, providing added curb appeal.
Before a deck can be painted, all loose paint must be scraped and rough patches sanded smooth. A power sander hastens the sanding process.
Painting your deck can give it a fresh new look, and help to protect the surface from the elements. However, this task is not one that should be taken lightly. Proper deck painting prep is essential to ensure that your new coat of paint or stain lasts and looks great for a long time. This includes cleaning and sanding the surface, repairing any rotten boards or cracks, filling in nail holes, and making sure that any areas of the deck that are exposed to sunlight receive extra attention.
Depending on the size and style of your deck, you may choose to use either paint or stain to coat it. Both offer different aesthetic and protective benefits, with paint providing a more streamlined look that is often better suited for contemporary homes, while stains can highlight the wood’s natural features.
The first step in any deck painting job is to thoroughly clean the surface, using a power washer or garden hose with a high-pressure nozzle. You should also sand rough patches and smooth the wood to ensure that the primer or paint adheres properly. It’s a good idea to do this before you start working on the actual painting, as it will save you time and effort in the long run.
Once the surface is completely dry, you can begin the actual painting process. Choose a water-based primer that is designed for outdoor surfaces, and follow the manufacturer’s instructions for application. Once the primer is dry, you can begin applying the deck paint. Choose a color that compliments your home, and remember to apply a second coat as needed if the product’s instructions recommend it.
Choosing the right tools for the job is also crucial. A variety of brushes are available, allowing you to apply the paint with precision and control for details and corners, while rollers provide quick coverage for large areas. A sprayer can also be useful, giving you a smooth and even finish. Whatever tools you select, be sure to document your progress and work methodically to ensure that the entire deck is evenly coated.
Preparing the Surface
Whether you’re a do-it-yourselfer or enlist a professional, it’s important to make sure your deck is clean and ready for paint before you start. Start by removing all furniture, potted plants and other items from the area and using a broom or pressure washer to sweep away dirt, debris and loose paint. If needed, use a wire brush to scrub particularly stubborn areas of the deck. After cleaning, allow the surface to dry completely.
During this time, you can also take advantage of the opportunity to replace any damaged boards and make any necessary repairs. Once the surface is clean and dry, it’s important to choose a durable, quality paint. This will help the paint last longer and resist chipping, cracking and peeling, and will protect your deck from harsh weather conditions like rain or extreme heat.
You’ll want to carefully follow the product recommendations on your selected paint for proper application techniques. Typically, you will apply a coat of primer to the deck before painting. This helps the new coats of paint adhere well to the wood and creates an even surface for the final look. Some brands of paint require you to wait a certain amount of time between applying the primer and the final coat of paint, so be sure to read the instructions on your selected product carefully.
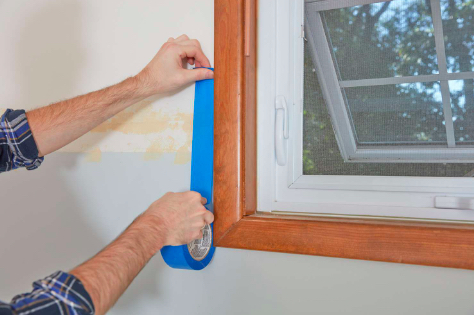
Once you’re ready to begin painting, be sure to cover nearby surfaces with painters tape and drop cloths. This will prevent accidental painting of windows, doors, metal railings and other objects, as well as yard ornaments, flowers or shrubs. You may also want to use an extension pole to reach high or hard-to-reach areas of the deck that are difficult to access without a ladder.
Compared to stain, paint can be more difficult to apply and requires more prep work to ensure an even surface. However, it’s available in a wide range of colors and can help the natural beauty of the wood shine through. If you are able to keep up with regular touch-ups and recoating, a painted deck can be as beautiful as one that is stained.
Applying the Primer
Whether the deck is new or old, it’s usually a good idea to apply a coat of primer before applying paint. This helps the new paint to adhere to the wood and reduces the chances of peeling. It’s important to choose the right type of primer, however. A stain blocking primer is ideal for painting over a stained deck because it prevents tannin stains and resin bleeds from showing through the final paint job.
After the primer has dried, it’s time to start painting. Depending on the condition of your deck, you may need to use more than one coat of paint to achieve an even finish. It’s also important to avoid putting on too much paint or you risk having to sand it off later.
To help you get a smooth and even finish, it’s a good idea to use a roller or paint sprayer. These tools are easy to use and allow you to cover large areas quickly. If you’re not comfortable using a sprayer, a brush can be used for detailed work or difficult to reach spots.
If your deck has slatted areas or details such as railings and spindles, it’s a good idea to brush them first with an angled brush. This will make it easier to get into the corners and nooks of your deck. You can then move on to the larger areas with your roller or sprayer.
Once the paint has dried, it’s a good idea to give your deck some time to settle before walking on it. You should also wait a few days before replacing furniture or using your deck for other purposes. If you’re unsure about how long it will take for the paint to dry, consult your local climate and check with the professionals at your nearest home improvement store.
While painting a deck is a big undertaking, it’s definitely doable if you know what you’re doing. By following the tips above, you can ensure that your deck looks its best and lasts for a long time to come. If you’re looking for a professional to handle the job for you, Sharp recommends getting referrals from family and friends.
Applying the Paint
Paint is a tough, durable material that can help protect decks from the elements. It comes in a wide variety of colors and can be mixed to match the aesthetic of your home, yard, or garden. Paint also makes it easier to clean a deck because dirt and grime cannot penetrate the surface of the wood as easily. However, it is important to keep in mind that once a deck has many layers of paint on it, it may be difficult or impossible to strip without damaging the wood underneath.
It is recommended that you use a wire brush to scrub the surface of the deck boards to remove any loose, flaking paint. If you do not remove all of the loose paint, it can cause the new coat to crack and peel. Once the surface of the deck has been cleaned and sanded, it is ready to be painted. Before you apply the first coat of paint, be sure to read the product instructions carefully. You should also pay close attention to the weather conditions where you live, as this can impact how long it will take for the deck to cure and become safe for foot traffic.
Before applying the paint, it is recommended that you cover any plants or items near the deck with plastic sheets to prevent splatters and drips. Then, using a paint roller, begin to apply the coats of paint in even strokes. Once you have covered the majority of the surface, be sure to use a brush to get into any nooks or crannies and to paint the edges of the deck. Be sure to allow the deck to dry in between coats and follow the product instructions for curing times.
Staining a deck serves the same aesthetic and protective functions as painting, but it tends to require less maintenance than paint. It is also possible to choose a stain that contains a built-in primer, which can save time and money. When choosing between stain and paint, consider the amount of maintenance you are willing to commit to, as well as your personal taste and budget.


 Home interior painting can transform a space, creating the perfect backdrop for your furniture, decor and lifestyle. It’s also one of the best return-on-investment home improvement projects, boosting your property value and helping you sell your home faster.