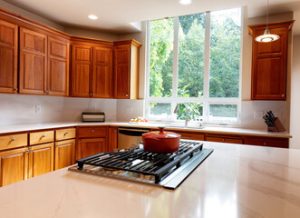
Tag: cabinet refinishing

Cabinet Painters Can Refresh Your Kitchen Or Bathroom Without the Costs and Inconvenience of a Full Renovation

Cabinet Painters

Cabinet painting can refresh your kitchen or bathroom without the costs and inconvenience of a full-scale renovation. It’s an affordable update that yields impressive returns in terms of increased home value.Cabinet Painters

Modesto Cabinet Painters have the experience and expertise necessary to deliver superior results. They use specialized products specifically designed for cabinets to ensure an impeccable, long-lasting finish.

Professionals know how to prepare surfaces and apply paint with precision, ensuring an even coat that covers any blemishes. They can also work quickly and efficiently to finish the job in a short period of time, which minimizes the amount of time that your kitchen is out of commission and limits the disruption to your daily routine.

Before the actual painting begins, professionals will carefully clean the cabinets and then prep them for painting by sanding and priming, ensuring that they get a long-lasting and beautiful result. This preemptive approach helps them avoid the common problems of DIY projects, like a lackluster finish or chipped and peeling paint that requires costly retouches and repainting.

A quality cabinet paint job can add significant value to your home, making it a worthwhile investment that pays off when you’re ready to sell. In fact, real estate agents often report that a fresh coat of paint can make or break a sale, especially in the case of a kitchen.

When selecting a contractor for your project, it’s important to ask about their experience and look at photos of their previous work. A reputable painter will be happy to share these with you, and they’ll likely have samples of their paints as well so that you can see the color and finish in person.

Professionals also understand the different types of cabinet finishes and will advise you on the best choice for your home. They will stay up to date on the latest styles and trends so that they can guide you toward a new look that reflects your personal taste and complements your home’s decor. They can also offer options for customization that aren’t feasible through DIY methods, like faux and textured finishes.

Durability

Professional cabinet painters use high-quality paints and primers designed for cabinetry, so their work stands up to years of wear and tear. This gives the finish a hard, smooth surface that resists chipping and peeling—and keeps your kitchen looking fresh. Professionals also pay close attention to surface preparation, ensuring that the paint adheres correctly. This helps avoid common problems, such as tannin and smoke bleed that can cause the finish to chip or discolor over time.

Durability matters, especially in a busy home kitchen. Whether you’re testing out a new recipe, working around kids doing their homework or snacking non-stop, or hosting frequent parties, your cabinets are subjected to a lot of wear and tear—and they should stand up to it without losing their sheen. Cabinet painting professionals use products that resist staining and damage from chemicals, oil, and household cleaners. They also offer a flexible finish that prevents cracking from exposure to temperature changes. Unlike wall paints, which often release volatile organic compounds and require a hazardous cleanup process, professional-grade cabinet coatings like Renner and Centurion are safe to clean with water and mild solvents.

Professionals also have access to wholesale pricing for quality materials, which cuts costs compared to purchasing them at retail. Additionally, their experience ensures that the project is completed smoothly and keeps disruption of your home and daily routine to a minimum. This adds up to significant savings on labor, material costs, and other associated expenses compared to DIY options that could end up costing more in the long run. This makes cabinet painting a smart investment for homeowners that want to save money and achieve a beautiful, lasting result.

Customization

Cabinet painting offers significant room for customization, allowing you to craft a custom look that aligns with your style preferences. From color selection to finishing techniques, a professional can guide you through your options, helping you to achieve a result that reflects the ambiance of your home or office. This flexibility can also ensure that your updated space adheres to local design trends and aesthetics, elevating the overall ambiance of your property.

As opposed to full-scale renovations, which require the dismantling of existing cabinets and the installation of new units, cabinet painting offers a more cost-effective and hassle-free solution. In addition, professional painters are able to complete the project in a shorter timeframe, minimising disruption to your daily routine and allowing you to enjoy your newly refreshed kitchen sooner.

A high-quality paint job will also last longer than DIY applications, avoiding the need for costly retouches and repairs in the future. Many professional painters offer a guarantee on their work, ensuring that any issues like chipping and peeling will be addressed promptly and without extra cost.

The aforementioned advantages of hiring a professional to paint your cabinets make it an excellent investment for homeowners looking to refresh their living spaces. As opposed to a full kitchen remodel, which can run into the thousands of dollars, cabinet painting is an affordable option that will significantly increase your home’s resale value and attract a broader pool of potential buyers. A well-maintained set of professionally painted cabinets is a welcome upgrade for any buyer, and may prove to be the selling point that secures your property’s next home. If you’re ready to see what a fresh coat of paint can do for your kitchen, contact our professional cabinet painters today to schedule a free estimate!

Convenience

Professional cabinet painting is a specialized service, and as such, it requires expert knowledge of products, procedures, and techniques. Despite this, many homeowners take on the task of DIY refinishing to save money and time. However, it is a complex and challenging job with a lot of potential for disaster.

The refinishing process begins with proper surface preparation, including cleaning, sanding, and priming. This helps ensure a high-quality finish that can stand up to daily wear and tear, moisture, and temperature changes. Professionals know how to prepare surfaces correctly, resulting in a flawless finish that lasts much longer than DIY efforts.

In addition, professional painters have access to high-quality tools that are often unavailable at hardware stores, such as sprayers and sanders, which result in a smooth, even finish that cannot be achieved with amateur equipment. Moreover, they use quality materials that are specifically formulated for cabinets to resist chipping and peeling, ensuring durability that exceeds the lifespan of typical consumer paints.

Finally, professional painters are skilled at color matching, and as such, can match your existing colors seamlessly. This results in a polished, cohesive look that elevates your home’s aesthetic. In addition, they understand how different finishes affect the appearance of a room and can recommend options that will complement your decor and enhance your space’s overall appeal.

Unlike full replacement, cabinet painting offers a cost-effective alternative to costly renovations and can be completed quickly to limit disruption to your everyday life. It is also a great choice for homeowners seeking to boost their home’s resale value, as a refreshed kitchen will be more appealing to prospective buyers. Ultimately, the advantages of cabinet painting far outweigh any initial concerns about the cost and complexity of this project.

Local

Cabinet painting is a great way to refresh the look of your kitchen or other rooms with existing cabinetry without the expense and hassle of replacing them. Reputable cabinet painting companies will use high-quality paints and finishes that are designed to stand up to the wear and tear of daily life. Unlike a DIY approach, cabinet painting is usually completed in just a few days, leaving you with a beautiful new look that will make your home feel fresh and inviting.

When choosing a cabinet painting contractor, it’s important to learn about their past work and the quality of their services. Ideally, you’ll want to work with someone who has extensive experience and specializes in kitchen cabinet painting. This will help ensure the best results and a flawless finish. It’s also helpful to find out if they have any references you can contact.

You’ll want to choose a company that is transparent about their cabinet painting method and uses paints that are designed specifically for cabinets. While there may be a wide variety of paint color options available, the best option for cabinetry is a semi-gloss or glossy finish. These finishes are durable and can withstand food and grease stains.

Before the project begins, it’s important to clear the workspace and remove any fragile items that could be affected by the painting process. It’s also helpful to have a plan for keeping your kitchen organized during the renovation. A reputable cabinet painting company will provide a detailed work plan and schedule, including how long the project will take. This will allow you to plan your cooking or dining space accordingly, reducing the amount of disruption to your daily life.

Proper Deck Painting Preparation

Deck Painting

Paint gives a fresh, colorful look to an old deck and helps protect the wood. Paint can also unify the color of a house’s exterior with the deck, providing added curb appeal.Deck Painting

Before a deck can be painted, all loose paint must be scraped and rough patches sanded smooth. A power sander hastens the sanding process. Contact Gold Lion Painting Inc for professional help.

Painting your deck can give it a fresh new look, and help to protect the surface from the elements. However, this task is not one that should be taken lightly. Proper deck painting prep is essential to ensure that your new coat of paint or stain lasts and looks great for a long time. This includes cleaning and sanding the surface, repairing any rotten boards or cracks, filling in nail holes, and making sure that any areas of the deck that are exposed to sunlight receive extra attention.

Depending on the size and style of your deck, you may choose to use either paint or stain to coat it. Both offer different aesthetic and protective benefits, with paint providing a more streamlined look that is often better suited for contemporary homes, while stains can highlight the wood’s natural features.

The first step in any deck painting job is to thoroughly clean the surface, using a power washer or garden hose with a high-pressure nozzle. You should also sand rough patches and smooth the wood to ensure that the primer or paint adheres properly. It’s a good idea to do this before you start working on the actual painting, as it will save you time and effort in the long run.

Once the surface is completely dry, you can begin the actual painting process. Choose a water-based primer that is designed for outdoor surfaces, and follow the manufacturer’s instructions for application. Once the primer is dry, you can begin applying the deck paint. Choose a color that compliments your home, and remember to apply a second coat as needed if the product’s instructions recommend it.

Choosing the right tools for the job is also crucial. A variety of brushes are available, allowing you to apply the paint with precision and control for details and corners, while rollers provide quick coverage for large areas. A sprayer can also be useful, giving you a smooth and even finish. Whatever tools you select, be sure to document your progress and work methodically to ensure that the entire deck is evenly coated.

Preparing the Surface

Whether you’re a do-it-yourselfer or enlist a professional, it’s important to make sure your deck is clean and ready for paint before you start. Start by removing all furniture, potted plants and other items from the area and using a broom or pressure washer to sweep away dirt, debris and loose paint. If needed, use a wire brush to scrub particularly stubborn areas of the deck. After cleaning, allow the surface to dry completely.

During this time, you can also take advantage of the opportunity to replace any damaged boards and make any necessary repairs. Once the surface is clean and dry, it’s important to choose a durable, quality paint. This will help the paint last longer and resist chipping, cracking and peeling, and will protect your deck from harsh weather conditions like rain or extreme heat.

You’ll want to carefully follow the product recommendations on your selected paint for proper application techniques. Typically, you will apply a coat of primer to the deck before painting. This helps the new coats of paint adhere well to the wood and creates an even surface for the final look. Some brands of paint require you to wait a certain amount of time between applying the primer and the final coat of paint, so be sure to read the instructions on your selected product carefully.

Once you’re ready to begin painting, be sure to cover nearby surfaces with painters tape and drop cloths. This will prevent accidental painting of windows, doors, metal railings and other objects, as well as yard ornaments, flowers or shrubs. You may also want to use an extension pole to reach high or hard-to-reach areas of the deck that are difficult to access without a ladder.

Compared to stain, paint can be more difficult to apply and requires more prep work to ensure an even surface. However, it’s available in a wide range of colors and can help the natural beauty of the wood shine through. If you are able to keep up with regular touch-ups and recoating, a painted deck can be as beautiful as one that is stained.

Applying the Primer

Whether the deck is new or old, it’s usually a good idea to apply a coat of primer before applying paint. This helps the new paint to adhere to the wood and reduces the chances of peeling. It’s important to choose the right type of primer, however. A stain blocking primer is ideal for painting over a stained deck because it prevents tannin stains and resin bleeds from showing through the final paint job.

After the primer has dried, it’s time to start painting. Depending on the condition of your deck, you may need to use more than one coat of paint to achieve an even finish. It’s also important to avoid putting on too much paint or you risk having to sand it off later.

To help you get a smooth and even finish, it’s a good idea to use a roller or paint sprayer. These tools are easy to use and allow you to cover large areas quickly. If you’re not comfortable using a sprayer, a brush can be used for detailed work or difficult to reach spots.

If your deck has slatted areas or details such as railings and spindles, it’s a good idea to brush them first with an angled brush. This will make it easier to get into the corners and nooks of your deck. You can then move on to the larger areas with your roller or sprayer.

Once the paint has dried, it’s a good idea to give your deck some time to settle before walking on it. You should also wait a few days before replacing furniture or using your deck for other purposes. If you’re unsure about how long it will take for the paint to dry, consult your local climate and check with the professionals at your nearest home improvement store.

While painting a deck is a big undertaking, it’s definitely doable if you know what you’re doing. By following the tips above, you can ensure that your deck looks its best and lasts for a long time to come. If you’re looking for a professional to handle the job for you, Sharp recommends getting referrals from family and friends.

Applying the Paint

Paint is a tough, durable material that can help protect decks from the elements. It comes in a wide variety of colors and can be mixed to match the aesthetic of your home, yard, or garden. Paint also makes it easier to clean a deck because dirt and grime cannot penetrate the surface of the wood as easily. However, it is important to keep in mind that once a deck has many layers of paint on it, it may be difficult or impossible to strip without damaging the wood underneath.

It is recommended that you use a wire brush to scrub the surface of the deck boards to remove any loose, flaking paint. If you do not remove all of the loose paint, it can cause the new coat to crack and peel. Once the surface of the deck has been cleaned and sanded, it is ready to be painted. Before you apply the first coat of paint, be sure to read the product instructions carefully. You should also pay close attention to the weather conditions where you live, as this can impact how long it will take for the deck to cure and become safe for foot traffic.

Before applying the paint, it is recommended that you cover any plants or items near the deck with plastic sheets to prevent splatters and drips. Then, using a paint roller, begin to apply the coats of paint in even strokes. Once you have covered the majority of the surface, be sure to use a brush to get into any nooks or crannies and to paint the edges of the deck. Be sure to allow the deck to dry in between coats and follow the product instructions for curing times.

Staining a deck serves the same aesthetic and protective functions as painting, but it tends to require less maintenance than paint. It is also possible to choose a stain that contains a built-in primer, which can save time and money. When choosing between stain and paint, consider the amount of maintenance you are willing to commit to, as well as your personal taste and budget.